And shop we did! My LQS was having a sale and I picked up 8 meters of fabric at $5 each.
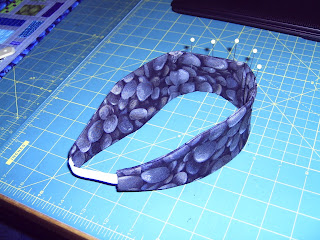
I love these stripes, and I went wild for the pebbles! I'll make my headband out of this print.
The last piece is this fugly green. It looked much better in the dim light at the sale racks in the back of the store. In real light it's a sinister shade of chartreuse. I'll save it for backing, unless anyone wants a straight up trade. Anyone? Anyone? Bueller?
Now for a first run-through with the headband I designed. Ready?
1. This is the pattern. Cut out two on the fold.
You will have two pieces that look like this.
2. Place the pieces right sides together, and pin onto a scrap of batting.
During pinning, I placed a 3 1/2" piece of elastic in one short end. (Note to self: buy more black elastic.)
I also used my double pin trick to delineate start and stop points to allow for turning.
3. Sew around fabric edges using 1/4" seam allowance. I backstitched an extra time over the elastic. This will be a heavy stress point.
You can sort of see in the above picture that I skipped sewing the end without elastic. This is very important! I sewed right to the ends and backstitched. Then I picked up the presser foot, shuffled the fabric into the new start position, and kept sewing without cutting the thread. You can see better on the batting side.
4. Trim.
5. Turn and press. Do not push out the non-elastic end all the way. Leave the seam allowance tucked in.
6. Pin the opening closed.
Push the free end of the elastic into the open end of the headband, being careful not to twist it. Stick a pin in to hold it.
7. Double topstitch around the entire piece. Backstitch at both stress points.
8. Brace yourself. Model for the camera and hope that random aiming hits the target. Posts pictures of yourself wearing completed headband on the scary internet.
 |
| I'm certainly not normally this Caucasian, but with the flash right at the end of my arm....you get the point. |
Things to do differently next time include using elastic that matches more closely, and redesigning to take an inch off the width. I was also debating adding an extra 1/2" to the elastic length, but I've been wearing it while writing this post and I like the snugness. I have a plan to do a paper-pieced headband using a similar pattern. Oh! Oh! What if I.... scalloped the edge of the pattern before cutting? Or quilted the whole way across instead of just topstitching? Or sew with a solid fabric and use FMQ in contrasting thread to add visual interest?
So many ideas! But it'll have the wait. I did promise my girls Easter dresses since Mommy didn't make them new Christmas dresses. To the big box of stash I go!


girl shopping...good, girls shopping for fabric....wonderful xx
ReplyDeleteCan you believe that it's been two whole months since I added anything to my stash?? I should've been buying fat quarters at least - just to keep my creative juices amped up.
DeleteWhile this advertisement is a fascinating read, I cannot endorse your Mall for any reason. Quilters are people who make beauty out of scraps and do not, for the most part, shop for "richness, royalty and majesty." We are real people who know (sometimes through painful lessons learned) that family and a job well done are what brings happiness. We are not people who have huge disposable incomes and run after the next big thing to buy. We thrive not on competition and "keeping up with the Joneses" but on encouragement, sharing, love, and pride in a hand made job completed to the best of our ability.
ReplyDeletePlease do not post advertisements on my website again.
I do like your green - though it is hard to tell the true color on a computer screen.
ReplyDeleteHope you have had a nice week and enjoyed some good sewing and quilting time.
Regards,
Anna